


 Victorian
mass housing
estates a typical
house rents
and
incomes house
plans the
kitchen the
kitchen
fire the
scullery the
parlour the
bedrooms the
sash
windows the
front
approach the backyard and
garden the
outside
lavatory

How to repair broken cords of sash windows
A guest contribution by Richard Cole
On occasions, the cords of sash windows broke with the wear and tear of use.
Dangers of badly maintained sash windows and of preparing them for mending
Inserting a new cord required a great deal of care because, once one cord had gone, all the weight of the window was taken by the remaining cord, which skewed the window sideways and jammed it. The remaining cord could then also break under the extra strain, bringing the whole window crashing down. This is something my mother is on record as remembering. My father too has a recollection of it: His landlord was opening a sash window when both cords broke. The lower sash which had been raised came crashing down trapping his fingers. The window was very heavy without its counterbalancing weights and someone had to fetch a poker to lever it up so that he could get his fingers out. His fingers were painful for some time afterwards, but fortunately were not broken.
Stages in the repair
Replacing broken sash cords was a performance.
First the beading had to be prised off from the edge of the frame, so that the window could be swung out on its one remaining cord. This was not as simple as it sounds because the beading was invariably stuck in place with paint.
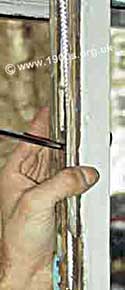
Removing the beading from the edge of the frame*.
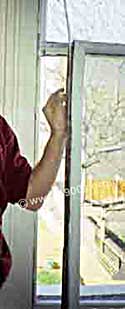
Swinging the sash window out on its remaining cord*.
With the beading removed, the edge of the frame could be removed, revealing the channel which held the counterweight.
This weight had to be attached to a new cord which had to be threaded through the pulley at the top of the frame. Then the other end had to be re-attached to the window.
The cord had to be the correct length: long enough that the window could be fully lowered, but not so long that the counterweight lay on the bottom of its box before the window was fully raised.
Then the edge of the frame had to be replaced. The window had to put back into position, and so did the beading. Nail holes needed to be refilled, and some paint touching up was invariably also needed.
If you can add anything to this page or provide a photo, I would be pleased if you would contact me.
Contributed by Richard Cole
* Photos courtesy of Sash Repairs.
sources: early 20th century material
sources: ww2 home front and other material
contact
the webmaster/author/researcher/editor
privacy policy

