


 Victorian
mass housing
estates a typical
house rents
and
incomes house
plans the
kitchen the
kitchen
fire the
scullery the
parlour the
bedrooms the
sash
windows the
front
approach the backyard and
garden the
outside
lavatory

How to paint old wooden window frames
A guest contribution by Neil Cryer
Before today's replacement windows, all windows had wooden or metal frames which required regular maintenance. This page describes and explains the steps in preparing and painting the wooden window frames. There are inset boxes on particular issues for sash windows - and most windows in the past were the sash type.
After reading, you will understand why plastic replacement windows were welcomed!
Why wooden window frames need regular painting
The biggest problem with all painted woodwork is water. Once water can find its way into wood, the wood tends to expand. This strains the bonding between it and the paint, and the paint starts to peel. The resulting surface is unsightly and impossible to paint neatly or evenly. Eventually the wood rots. Well-maintained paintwork prevents water seeping into the wood underneath.
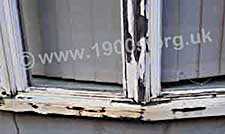
Flaking paintwork on rotting wooden window frames
With wooden window frames, there is the added problem that the wood swells when damp gets in, making the windows stick and even lock in position so that they can't be opened or closed.
So it is very important to keep the paint on the wooden window frames in good condition. As a general rule, repainting is required after every 5 to 8 years.
Painting sash windows
I never lived with sash windows, but I do remember as a child visiting houses which had them and being told, "That window doesn't open".
The problem was that however carefully the windows had been painted, some paint had invariably spilled into the channels. So layers of set paint built up there which spoilt the fit and made the windows stick. As often as not, windows simply would not open. This made the care and maintenance of sash windows particularly important.
Preparation for painting
The next few sections are about the very important task of preparation before painting, but first an aside on the additional preparatory task for sash windows.
Difficulties of access for painting sash windows
Painting sash windows is such a palaver because some part of the window and its wall frame is always inaccessible, irrespective of how the window opening is adjusted.
One solution is to work alternately inside the house and outside up a ladder.
The other solution is to partly or wholly remove the window as explained on the page about mending sash windows.
Removing black mould
AA typical problem with wooden window frames is black mould. It grows in a damp atmosphere such as when there is frost or condensation. It is particularly bad on the inside of bathroom windows.
Any black mould on windows needs to be removed before painting. Today there are commercial formulations, but two methods were widely used in the past. They were relatively safe and they killed the mould as well as removing it.
- Baking soda was made up into a solution of about a teaspoon to two cups of water. It was then used to scrub the surface with a stiff brush followed by rinsing off with water and drying.
- Vinegar was brushed straight onto the mould and scrubbed as with the baking soda, followed by rinsing the surface.
Bleach was also used but was not ideal because it required precautions such as wearing old clothing, rubber gloves and face protection.
Removing loose flaking paint
Paint flaking is a clear sign that painting is urgently needed because it means that water can get in.
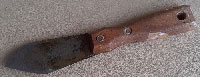
I remember helping my father to scrape off flaking paint with a triangular scraping tool like the one in the photo.
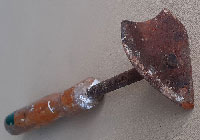
A triangular scraper
Scraping had to be followed by sanding with sandpaper.
Removing old layers of paint
Where a wooden surface has been repeatedly painted, layers of paint build up which makes the surface thicker. With window frames, this affects the fit which means that all the layers of paint may need to be removed.
These days, commercial paint strippers are available, but in the past people made their own. The following ways were typical.
- Washing soda dissolved in water and thickened with flour, heated to activate the thickening, then allowed to cool.
- Vinegar similarly thickened so that the mixture stays on the surface.
The strippers soften the paint; they do not dissolve it. So they need to be left on the surface for about an hour then scraped off and rinsed.
Paint stripping tool. This may look like the tool for stripping wallpaper, but it is rigid, shorter and narrower so that it can take more pressure. Wallpaper strippers are flexible.
Repairing the putty joint between the glass and the frame
Panes of glass are fixed into wooden frames with putty. When fresh, this is a pliable material based on linseed oil, which sets hard on exposure to the air as the linseed oil evaporates and seeps into the wood. Then the putty is waterproof.
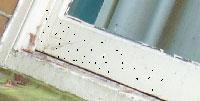
A typical problem is cracked putty and the odd gaps that eventually open up between the glass and the putty, letting in water.
Painting over fresh and uncracked putty does prolong its life, but in time the edge that meet the glass become bumpy and jagged. This lets water in, as well as producing a messy appearance.
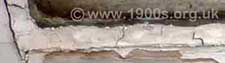
Cracked putty in a wooden window frame
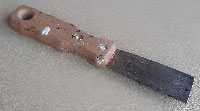
It is vital that such gaps were sealed as soon as possible. I remember filling these gaps using a knife with three differently shaped corners for getting the putty into differently shaped gaps. It was called a putty knife.
A putty knife
Where the putty is severely cracked, there is nothing for it but to scrape it all out and refill completely. This is not a difficult task with a putty knife because fresh new putty is quite soft and pliable. It does need to be fresh though, as old putty goes hard.
Repairing holes in a window frame
Before painting wooden window frames, it is important to inspect the wood for any holes. These can be filled with commercially available wood filler or, if the holes are not too large, even putty.
In the past, with much in the home being made of wood, there was the ever-present problem of woodworm. Woodworm is a small maggot that eats wood. Infestations of woodworm can be spotted as identical tiny holes. In a bad infestation the wood can become significantly weakened. Immediate treatment is vital.
Woodworm
Woodworm in a sash window
In the past everyone recognised at a glance the typical small holes that woodwarm causes. I have childhood memories of always being on the lookout for them.
My father treated our woodworm by brushing on a commercial woodworm killer. It had a very strong smell that took quite some time to go. It needed to be left a few days before painting.
Final sanding
After any necessary repairing, the final preparation for painting is to sand all of the surfaces.
Painting
Any bits of exposed bare wood need priming with a commercial primer.
In the past, if the new colour was to be different from the original one, the surface needed painting with an undercoat. This was relatively thick, so covered well, but did not give a gloss finish. Today, with modern paints, this stage tends to be left out.
Finally comes the top coat of a gloss paint.
An aside on metal casement windows
Metal window frames seem to have been common in the 1940s and possibly before for factories. They also had to be painted regularly because once the damp got in the frames rusted.
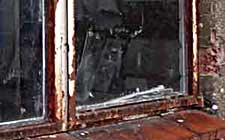
Rusting metal window frames
Text and images are copyright
sources: early 20th century material
sources: ww2 home front and other material
contact
the webmaster/author/researcher/editor
privacy policy

