How to make gravy: a traditional home-made recipe

Gravy is a sauce traditionally made from the juices that ooze out of meat and some vegetables while being roasted; it is often thickened with flour or cornflour (known in the USA as cornstarch) and has various colourings and flavourings added. This page gives my recipe which is based on watching my older family cook in my childhood but it uses modern labour-saving devices and methods. It can be prepared in advance, saves on washing up and can be simply adapted to be gluten free with no loss of taste or additional effort.
____
By the webmaster, based on watching older people cook, informal discussions and years of practice
Gravy can make or mar a roast meal. My recipe and methods produce gravy that is exceptionally well-received.
The recipe
- Some of the water which parboiled the potatoes and parsnips ready for roasting - now cooled.
- One or more stock cubes, which have to be beef, whatever the meat being roasted - but see the section below on gluten free. Yes, Oxo stock cubes were sold in late Victorian times and possibly earlier, so the ingredients really are traditional.
- A good dollop of home-made dripping frozen from a previous roast.
- Plain flour to thicken - but see the section below on gluten free.
Note the absence of gravy granules. They are not for me because they combine colour, flavour, thickening and other additives with no user-control over what is there or in what quantities.
Quantities of ingredients
I tend to make my gravy rather by guesswork in the knowledge that I can always add more flour if the gravy isn't thick enough, more water if it's too thick and more dripping if the taste isn't strong enough. I do, though, stick to the guideline of one beef stock cube for two people.
Step by step method for traditional home-made gravy
My method for making gravy still gives the good old-fashioned taste, but frees me from having to do several jobs at once at serving time. I make it in advance at the start of preparing the main meal and just heat it up for serving.
If it appears from what follows that there are a lot of steps, this is not the case as most are just what you have to do anyway for a home-made roast meal. The significant difference is in the order of the steps.
Step 1
This has to be the first step to allow for cooling.
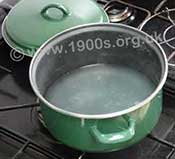
Parboil the root vegetables. This serves two purposes. Parboiled root vegetables, once cooled, crisp better during the roasting and the water from the parboiling makes a stock for the gravy. (The parboiling has to be done some time ahead because root vegetables can take an hour or more to roast crisply.) Try to include parsnips as well as potatoes because roast parsnips have a delicious taste and give some of it to the water in which they are parboiled. (Don't be misled by the taste of boiled parsnips which is quite different.) Save the water for stock and allow it to cool to room temperature.

Water from parboiled root vegetables, cloudy because of the flavour given to it.
Step 2
Also in advance, put about 2mm of cold water with the flour into another saucepan, choosing one with a wide base. Flour mixes smoothly into cold water, but not in hot.

Flour in a few mm of cold water in a separate saucepan

Flour being stirred and squashed into the cold water - easiest if the saucepan has a wide base.
Provided that the saucepan is wide enough, you can go at the lumps and give them a good squash until you have a smooth paste. A straight edged wooden spatula is ideal for the squashing and later for the stirring.
Step 3
Add the cooled water from parboiling the vegetables.

Cooled liquid from the parboiled vegetables being poured into the mixture of flour and water

Stock cube(s) being sprinkled in with one or more lumps of dripping

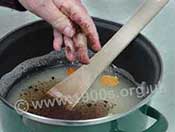
Heated gravy thickening in saucepan while stirring
Sprinkle in the beef stock cube and a good lump of dripping and bring to the boil stirring all the time until the liquid thickens. Using a straight-bottomed wooden spatula and stirring with a scraping motion prevents sticking and burning at the bottom of the saucepan.
Step 4
When thickened, the gravy is ready for the table, but as it has been prepared in advance, it must be removed from the heat until close to serving time.
Step 5
Because all this is done in advance, you can check the thickness of the gravy and add more flour if it is too thin, more water if it is too thick and more stock cube and dripping if the taste isn't strong enough. Any additional flour must be mixed into a paste with a little cold water first as adding it directly to hot gravy will make the gravy go lumpy. I like my gravy thick and my family and visitors all seem to like it this way too.

Gravy being served with a roast meal
A few minutes before serving, reheat the gravy gently in the saucepan, stirring occasionally with the wooden spatula. The best way to stir is to keep the spatula scraping the bottom of the saucepan as this prevents burning onto the bottom of the saucepan.
Finally dish up.
Enjoy!
Gluten free gravy
Gluten free gravy is essential for me as I am intolerant of gluten. So you can be sure that I have tried and tested what I am about to tell you about the changes needed to the flour and the stock cubes in the above recipe. If you keep to these guidelines, the resulting gravy should be safe as well as delicious for anyone suffering from Coeliac disease or otherwise gluten intolerant.
Flour for thickening gravy with no gluten
The regular plain flour that I used to use in my gravy is unsuitable for anyone intolerant of gluten because it is based on wheat. Fortunately, flour with no gluten is widely available in supermarkets, and I find that it works well for thickening. So I use it for everyone's gravy, irrespective of whether or not they can't take gluten. This saves me making a separate lot of gravy.
Cornflour (cornstarch) also has no gluten. It seems to give a glossier finish than regular flour which you may or may not like. I find that less cornflour than regular flour is needed for thickening.
Stock cubes for gravy without gluten
There is the need for more manufacturers to reduce the gluten in their stock cubes. What follows is accurate as I write, but do read the labels as change is ongoing.
As mentioned above, beef stock cubes are essential in my view for best-tasting gravy, and I used to insist on those made by Oxo. However, as I write, they contain wheat which does contain gluten. This may have changed by the time you read this. Check!
I have tried other makes of stock cubes and stock pots that do not contain wheat, but they are all far too salty for my taste. They may not of course be for yours. Also, they tend to produce pale gravy which I find unappealing. So I don't use them. However, the wheat in half an Oxo beef stock cube (my measure of cubes per person) is fairly small, so some gluten-intolerant people may be able to take it. But, check, check, check!
The alternative entirely free from gluten is to cut out the use of stock-cubes and add flavour with more home-made dripping and frozen juices from a previous roast. I have tried shop-bought dripping, but don't find the taste distinctly unpleasant - but of course this may have changed by the time you read this.
The gravy can be darkened with gravy browning which is sold in all good supermarkets and has no gluten. There are recipes on the internet for making your own, but that is a step too far for me. Another colouring agent is dark soy sauce, which may to be too salty for some people's taste, but has no gluten. As always, check the label!
If you have another solution for delicious gravy free from gluten - emphasis on delicious - I would like to hear from you.
| sources | webmaster | contact |
Text and images are copyright
If you can add anything to this page or provide a photo, please contact me.


