 cleaning
sewing and
cleaning
sewing andmending darning how to knit quickly and effortlessly new
knitting
yarn from old knitting patterns and needles dealing with moth
damage men's work and
activities mending boots and shoes maintenance
and
decorating

In the past, only wool was used for knitting, but the inclusive word 'yarn' is used here unless wool is specifically intended.
Usable knitting yarn from left-over balls and outgrown or worn knitwear
In the 1940s and 50s when I was growing up, new wool from wool shops was in short supply and rationed. Money was also in short supply. So people resorted to knitting with scraps left-over from other knitting and unravelled from knitwear that was worn or outgrown. This wasn't as easy as it may sound. Left-over scraps were of unmatching colours which needed to be used in patterns to stop the resulting garment looking gaudy, Also unravelled yarn was not straight and worn bits needed the worn bits cut out. There were ways of managing all of these as described below.
How to get usable yarn from unravelled knitwear
First the knitwear needed to be carefully unpicked at its seems. Careless snips could further damage the precious wool.
The unravelling process itself was straightforward because knitting is a form of chain stitch. All women - yes it was always women when I was a child - had to do was to snip an end and pull. If pulling immediately resulted in a knot; pulling the other end unravelled easily.
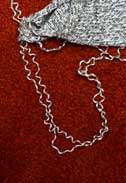
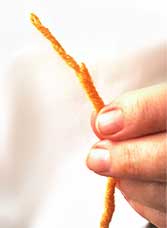
Yarn unravelled from old knitwear, kinked into the shapes of the original stitches.
However, the resulting yarn wasn't smooth or straight because it had been 'set' into the shape of the stitches as shown in the photo. It had to be straightened before re-use.
How to straighten unravelled yarn
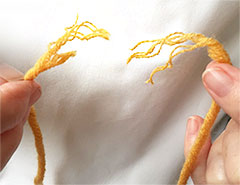
To straighten the unravelled yarn, women first had to coil it into what were called skeins as shown in the second picture. Then they had to hand wash it gently and hang it up to dry it, still in its skein shape. This process straightened the yarn completely.

Unravelled yarn in a loose skein, ready for washing and drying to remove its kinks.
How to wind skeins into balls
The dry yarn could not be knitted directly from skeins as it would quickly get tangled. It first had to be wound into balls. This process required two people - although there were various gadgets that never worked properly which claimed to replace the second person.
One person had to hold out the skein as shown in the following sketch while the other person would take one end, pull it off the skein and wind it into a ball. The person holding the skein had to watch which end the yarn would be wound from next and move that arm towards the other person, so that the yarn would slip easily off the hand. Then that arm had to be moved back and the other arm had to be moved forward, in time with the person winding.
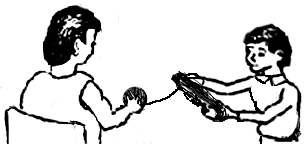
Winding a skein of yarn into a ball. Holding the skein was invariably a task for children, and was very tiring because arms had to be outstretched and swung in and out and to and fro to allow the yarn to come off the skein at constant tension.
It was very tiring to keep doing this with outstretched arms, and also extremely boring as so many skeins needed to be balled for a whole garment. Inevitably the task fell to children, and many a child had to sit in front of mother or grandmother, arms outstretched, swaying them to and fro while mother or grandmother unwound the yarn from the skeins and into balls.
Two interesting asides: Actors get it wrong!
In the 1910 version of TV's Upstairs Downstairs, there was a brief clip of Sir Hallam Holland holding a skein of wool for his wife who was winding it into a ball. The script had him saying that he often used to do this for someone else in his family. Yet he clearly never had in real life, and there was no-one old enough on the acting set to tell him that he was doing it wrong! He held the skein loosely so that it sagged, which would rapidly have come off his hands and tangled; and he did not move his arms forwards and backwards and to and fro with the flow of the wool, which would have resulted in the wool catching on his fingers.
Even new yarn had to be wound into balls
The task of winding skeins into balls also applied to new yarn from wool shops because it was often sold in what were called 'hanks'. A hank was a skein loosely coiled and twisted into a manageable lump.
How to join lengths of yarn together
Yarn that was reclaimed from worn out knitwear had to have the worn pieces cut out and the remaining pieces joined together. Similarly, oddments of left-over yarn had to be joined for the final knit. The pieces could be joined with a knot, either with the knot placed at the back of the knitting or - preferably - at the end of a row so that the loose ends could be sewn in once the garment was complete. However there was an even neater way.
The photos show the sequence of actions. In making them I had to use thick yarn to make clearer photos, and all that was available to me was a man-made fibre of some sort, which I found rather fiddly because it so readily frayed. With actual wool which clings more readily to itself, the joining action is straightforward. I used to make these joins numerous times entirely successfully with wool.
The join is of course is weaker than the rest of the yarn but once there are rows of knitting above and below it, these hold it in place. While making a stitch at the actual join, it is best to hold the join together with the fingers of one hand. This is fiddly but by no means impossible.
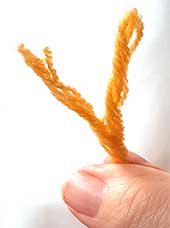
Take the end of one length of yarn and splay it into two.
Cut off one of the two splayed ends.
The result should look like this.
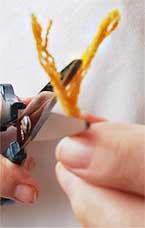
Do the same to the end of the yarn that is to join, and fray out the ends of both lengths. The result should like this.

Twist the two frayed ends together with an overlap. A little water can provide a temporary adhesive. Then tie each end of the join in place with a bow of thin thread. Keep the bow in place while knitting. Once there are rows of knitting above the join, the bow can be gently pulled undone, the thread teased out and any fraying at the ends of the join cut off.
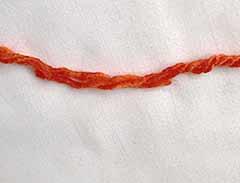
My experience of joining yarn was almost entirely with wool - and wool clings to itself. For a wool join, I needed no ties - only care when making the stitch at the join. An uneven twist didn't show in the final garment.
Yarn from non-matching left-overs: Fair Isle knitting
To prevent knitting from coloured left-overs from looking garish, colours and patterns of colour had to be chosen carefully. These patterns reflected existing styles known as Fair Isle, or Fairisle. Patterns could be bought from wool shops, but women often used their own creations for bands of colour.
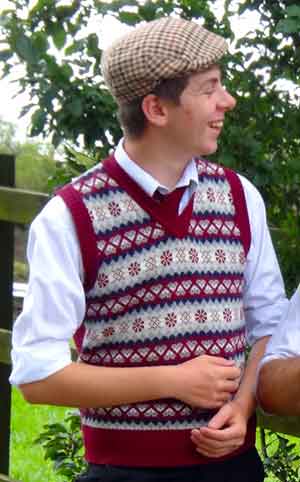
Boy's Fair Isle jersey

This detail from a photograph on a Silver Street School page shows how usual it was to wear hand-knitted garments and how intricate stitches and patterns were commonplace.
Swapping left-over yarn for greater variety
My mother was about 18 when WW2 began, so her recollections were very clear. She told us quite a lot about making the best of things during the rationing and shortages. She talked about unravelling worn jumpers and washing and straightening the wool, and re-knitting it, often as Fair Isle with its intricate repetitive and multi-coloured designs. The different coloured wools are carried across the back of the knitting, which meant that thin wool could be used while still making a thicker warm garment.
My mother and her workmates used to swap tiny balls of different colours of left-over wool, so that they could make all sorts of attractive things. They made gloves, mittens, scarves and berets this way, using up tiny scraps of wool.
Sandra Hanson
If you can add anything to this page or provide a photo, I would be pleased if you would contact me.
Text and images are copyright
sources: early 20th century material
sources: ww2 home front and other material
contact
the webmaster/author/researcher/editor
privacy policy

